Thursday, August 18, 2011

Ice Cream Pies - A Family Favorite


Today is National Ice Cream Pie Day!

I've had this easy and special treat in my files for some time, and figured today is the day to finally reveal this wonderful recipe.

It's a 'secret' NO more! *_*


I found this simple recipe - only FIVE ingredients - on a cake mix box in the late 70's and it's been a family favorite ever since.

My kids have often asked for it for their birthdays...a simple combo of cake (brownie like) and ice cream - all in one.

The recipe makes TWO pies - one to enjoy now..one for later, when unexpected company drops by.  PERFECT! 

There's canned frosting in the base of the pie, and then the leftovers are warmed and drizzled over the top - sooo easy! 


Trust me...this is a dish that's sure to have you score 'points' with your family.

Never fear - the cake part WILL fall after it's baked - it's suppose to. 

I remember having overnight guests, and when she saw my cake she said "Awww - it fell".

I proudly told her it was suppose to! (You fill it in with the ice cream!)
(hover over photo to pin) 

Choose a favorite ice cream - make ahead and you'll be ready to party (for whatever reason) and there will be no last minute rush.

The base of this dessert is like a fudgy brownie - OOOOO SOOOO GOOOD!
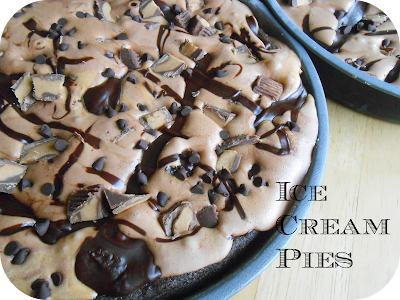
ICE CREAM PIES

1 - 18 ozs. devil's food or chocolate fudge cake mix
3/4 c. water
1-1/4 c. prepared chocolate frosting, divided
1/4 c. vegetable oil
1/2 gal. favorite ice cream, softened
chopped peanuts or candies, optional

Preheat oven to 350. Generously grease and flour bottom, sides and rim of 2 - 9" pie or round cake pans. (I always use the cake pans).

In large bowl, beat cake mix, water, 3/4 c. frosting and oil on high speed for 2 minutes.  Spread 1/2 batter in bottom of each pan (don't spread up sides).

Bake 25 - 30 minutes - don't overbake. (middle will be soft when done). Cool completely; cakes will collapse.

Spread 1/2 of ice cream in each shell.  Heat remaining frosting and drizzle over ice cream. Sprinkle with peanuts or chopped candies if desired. 

Wrap tightly and freeze atleast 2 hours or up to 2 - 3 weeks. Allow to stand at room temp for 10 minutes before serving.

(I like to stand a few toothpicks up at an angle...in the pies before wrapping in foil...so the foil stays off the frosting part. (Just be sure to let pie thaw a tad before trying to remove the toothpicks...or they may break off. 
(Please don't ask me how I know that!!=) 


Print Friendly and PDF


Tuesday, August 16, 2011

"Lightened" Strawberry Pizza

I'm happy to be sharing this delightful summer dessert, and wanted to be sure I shared it before summer comes to an end.

In my humble opinion, fresh summer strawberries can't be beat! Add cream cheese, and a crunchy crust and you've got a real winner!


The dear friend I received this recipe from, always chooses to share this recipe whenever she gets an email recipe exchange request.

(Thank you Kristal!)  

It's easy enough to put together and will be gone quickly, so make sure you have the ingredients to make another....pronto!

{It was good enough to add to my cookbook too.}

Changes I made: I cut the butter by 1 Tb. for the called amount. Not that it makes much difference, except it isn't as sticky when pressing into the pan. Instead of the block of cream cheese, I found an 8 oz. tub of strawberry cream cheese spread - 1/3 reduced fat - hiding out in my fridge.

Because it was already sweetened, I didn't add the powdered sugar. (You can always substitute splenda if you need to watch the sugar intake). I also used the sugar free glaze.

It is so delicious. I ate my first piece for breakfast - right after I made it. And another piece for lunch.

You get the idea I'm sure.


STRAWBERRY PIZZA

1-1/2 c. all purpose flour
1 c. cold butter, cut into chunks
1/2 c. brown sugar
1/2 c. chopped pecans
1 - 8 oz. cream cheese, softened
3/4 c. powdered sugar
1 - 8 oz. tub Cool Whip, thawed
4 c. cleaned, sliced fresh strawberries
1 - 16 oz. pkg. strawberry glaze

Preheat oven to 350. In lg. bowl, combine flour, butter, brown sugar and nuts. Spread on 14" pizza pan or 10" X 15" X 1" cookie sheet.

Bake 12 - 15 minutes until browned. Cool.

In medium bowl, combine cream cheese and powdered sugar; beat until smooth. Fold in whipped topping and spread over cooled crust. Refrigerate for 15 minutes to set up.

In large bowl, combine fresh strawberries and glaze until coated. Spread out over cream cheese filling, then top with dollops of Cool Whip to serve. Keep leftovers refrigerated.

Enjoy every tasty bite!!!!


Print Friendly and PDF


Weekend Potluck
Meal Plan Monday

Monday, August 15, 2011

500 Fans & a Giveaway!! (Update & Winner!)

CONGRATS & HURRAY!  The winner of the first item (cookbook) in this giveaway goes to comment #1 - silbook.

Winner #2 - the holiday recipe cards goes to
comment #14 - catfish_kisses@yahoo.com

Please contact me within 48 hours.


YAHOOOOOOOOOOOIE!!!

I am SOOO doggone beside myself to know I actually have 500 'likes' at Facebook!

That absolutely blows.my.mind!

THANK YOU ALL SOOOOOOO MUCH!  You are the best and I am honored that you are willing to be a follower of my blog.
I decided a while back that if/when the time came to reach 500 fans, I would use this lovely Taste of Home Christmas cookbook as a giveaway, and a second giveaway would include these cool holiday recipe cards that are
4" X 6".


The cookbook has gorgeous photos and recipes like...
- Cranberry Sweet Potato Bake
- Gingerbread Pancakes
- Praline French Toast
- Coffee Punch
- Cookies 'n' Cream Fudge
- Eggnog Fruit Bread...
and MUCH more!


YES!  There's going to be TWO gifts!

#1 -The cookbook and #2 - two sets of lovely holiday recipe cards.

The first name chosen will win the cookbook...the second will win the cards.

There are only 2 things you HAVE to do to enter.

1. Must be a Fan of Recipes & Recollections from The Better Baker at Facebook.

2. I want to know about one recipe I have posted that you have made or you want to make.

**For an EXTRA entry....

Become a Follower of The Better Baker blog, then come back here and tell me.


LADIES & GENTLEMEN...START YOUR OVENS....ER, UH....RATHER...

LET THE COMMENTS BEGIN....
(Be sure to leave your email address if need be)

(Winner will be chosen next Monday, August 15th)
Contest will close at noon.

SPREAD THE WORD PLEASE!!!!!!!!!


Fun Summer Day Cooking & Crafting at Nana's

Summer slips by so quickly...and somehow those grandkids seem to grow more in the summertime.

HOW DOES THAT HAPPEN?
Earlier in the summer, I began planning a day to spend with granddaughters, Charlie (12) & Chloe (10), so we could make memories in the kitchen, before they went back to school. They live just a few minutes from us and that makes it so nice!

What a fun day we enjoyed!  We were VERY productive too!

The first thing they did was make a dessert for them to take home, using swiss cake rolls. It was filled with pudding and needed to set. They cut the rolls into 1/8's and lined the bottom of sides of a springform pan.
(I lightly greased the pan first)


TA-DA!!!

Click here for a copy of the Chocolate Swirl Delight recipe at Taste of Home.

They enjoyed 'octopus & seaweed' for lunch....they loved it!
(ramen noodles tinted green)

It's difficult to see, but this octopus had a ketchup smile & eyes...or you could use mustard.


For instructions for making Octopus and Seaweed click here

And for dessert, I surprised them with 'fish sticks' (vanilla sugar wafer cookies coated with peanut butter, then dipped in crushed corn flakes) and mini burgers (mint pattie between two vanilla wafers - red frosting(ketchup)...white frosting(mayo)...and coconut tinted green for the 'lettuce')


We made paper towel butterflies and they took a 'flock' of them home...


For instructions for Paper Towel Butterflies at Skip to My Lou, click here

We also tried our hand at making tissue paper flowers.  The girls are soo crafty and talented I often feel like they're teaching me!  They did a beautiful job!


To watch a simple video with instructions for making these flowers, click here
(I'm a very visual person and seeing this made it so much easier to do)

We also made homemade ice cream...outside.  A simple and fun recipe in the "Kid's Corner" of my cookbook, and one I love to share. The girls often ask to make this cooling recipe - it's just too fun!

KID-FRIENDLY ICE CREAM IN A BAG

1 c. light cream (I used half vanilla flavored creamer) MM!
3 Tb. sugar
1 tsp. vanilla extract
qt. size ziplock freezer bag
2 gallon size ziploc freezer bags
crushed ice
rock salt

Mix first 3 ingredients together and pour into the qt. bag. Squeeze the air out and place it into a gallon bag (for safety sake). Squeeze out the air and seal. In the bottom of the second gallon bag, place some ice cubes and rock salt.  Place the other bags on top, then fill in the sides with more layers of ice cubes and rock salt so that it is higher than the level of cream. Then this is what you do...(it took us about 10+ minutes)

and this is what we got...

...with chocolate syrup on top...

Next....

I love recipes that require the kiddos to unwrap candies, so we made Rolo Brownie Bites with Caramel Cream Cheese Frosting.  OH MY!

These were simple to make and very tasty.
Photo credit: Cook Lisa Cook

Check out this cool recipe at Cook Lisa Cook

A.MA.ZING!

We also made Cow Pies (Candy)....a simple and easy Taste of Home recipe that even young kids to help with.

Click here for this easy 4-ingredient recipe.

This is a our "Grand Finale" picture with everything we did this fun day...
(Except the ice cream of course, cause it was gone)

We also played a couple of games of Sorry too!

What a sweet memory-making day!  I hope when the girls are grown, and I'm gone to my Heavenly Home, they will treasure these times in their hearts as I do now.  

I think we all slept good that night! *_*

(Eventually, I'll repost these recipes one or two at a time...)

Friday, August 12, 2011

Taco Chicken - Family Favorite

(This awesome recipe has been featured at a couple of linky parties=)

If you like a little zip to your meals, this is a wonderful dish to try.

My favorite ethnic dishes are Mexican.

I can't count the times I've seen friends who haven't crossed my path for some time...years even...and they'd tell me they're having my recipe for taco chicken for dinner, or they had recently enjoyed it. It has simply become laughable!

This is a popular dish and a great one to serve company too!

One of my friends told me she made this recipe -- (from my cookbook) - took it to share with her son and wife, and the 4 of them cleaned up this dishful of 'YUM' - a 9" X 13 panfull!

The crumbs on top and bottom are taco chips - I love that it can be made up a day ahead too.

Try it, I'm guessing you'll think it's 'muy bien'...

(*Update - Feb. 2016 - I recently served this at a potluck in the RV park where we stay here in Florida.  I received 5 THUMBS UP from across the room and came home with an empty dish!! I baked it for just about 2 hours in my 
CASSEROLE CROCKPOT! It was a real winner). 


TACO CHICKEN  

3 - 4 lb. chicken
1 onion, chopped
1 stick margarine
1 (10 oz) can Rotel tomatoes (with green chilies),
drained & mashed
1 (10-3/4 oz) can cream of mushroom soup
1 (10-3/4 oz) can cream of chicken soup
1 cup grated cheese
1 (7 oz) bag taco (or nacho) chips - {Doritos}

Boil or bake chicken; remove meat from bones; save 1 cup broth. Preheat oven to 350. In large skillet, saute onion in margarine. Add tomatoes, soups & broth. Heat and cook until thickened. Break 1/2 the chips into the bottom of a greased 9" X 13" X 2" pan, covering the bottom. Layer chicken over chips, then pour soup mixture over the top. Sprinkle remaining chips over chicken, then sprinkle with cheese. Bake 30 minutes or until bubbly around the edges.

Leftovers are great too - if there are any.


Linked to 

Printfriendly