Showing posts with label simple. Show all posts

Thursday, February 8, 2024

Valentine Cookie Cups (with a hidden treat inside)

These little cookie treats are perfect for Valentine's Day!

You start with a sugar cookie mix and add a few ingredients, 
then wrap dough around a candy kiss to surprise each recipient. 


I really LOVE shortcuts so this makes it easy for a last minute treat
if you need one. 

Get the kids to help by unwrapping the chocolates...and maybe even wrapping the dough around each candy. 

Homemade gifts from the heart are the best! These sweet treats definitely say LOVE, especially with the hidden 'kiss' inside. 

Don't waste any time...get busy making these fun cookie cups to 
give to friends or share with your family. They'll be so glad you did!

ENJOY A SWEET VALENTINE'S DAY!!!  


VALENTINE COOKIE CUPS 
(with a hidden treat inside) 

1 bag (17.5) ozs. package sugar cookie mix
1/2 cup (1 stick) salted butter, melted
3 Tb. all purpose flour
1 large egg
several drops pink or red food coloring
(I didn't measure, I just squeezed out a stream) 
24 Hershey's kisses (or hugs), unwrapped
Valentine sprinkles, optional 

Spray a mini cupcake pan with cooking spray - you'll need 24 total. Set aside. Preheat oven to 350*. 

In a large bowl, blend sugar cookie mix, melted butter, flour, egg and food coloring (I added food coloring to melted butter before adding to mix - you may add a few more drops as you're mixing if desired.)  I stirred this by hand. 

Using about  1 Tablespoonful of cookie dough, roll into a ball; flatten in your hand...covering most of your palm, placing the 'kiss' in the center. Wrap the dough around it to create a ball; roll until smooth. 

Place the cookie balls into muffin cavities and repeat until you use all the dough. 

Bake for about 12 minutes or until the outsides of the dough look set. Remove from oven and then top with sprinkles. 

Let cookie cups cool in pan for at least 15 minutes before removing from pan to cooling rack. 

Recipe inspired by Princess Pinky Girl


You may also enjoy....


Print Friendly and PDF

Sunday, March 26, 2023

Oatmeal Lemon Crumble Squares (egg free)


I love oatmeal anything!

The middle layer is made with sweetened condensed milk - 
that's always a YES in my book!


This is a simple recipe I saw at Sally's Baking Addiction - 
whose recipes I've learned to trust!

Go check this post out at her site...she 'only' has 131 
comments there!!! (I can only dream of having that many!) 
She shares lots of helpful tips for making this too. 

The crumbly oatmeal crust has brown sugar!  MMMM! 

You'll be so glad you whipped up this easy, egg-free recipe. 
The filling is only 2 ingredients and the taste of the cookie
square is so refreshing!!

THIS IS A GREAT DISH TO SERVE COMPANY!
(which I'm planning to do!) 

The bars freeze nicely, which is a real plus,
and means you can make them ahead! 

I like to cut my cookie bars in small squares so if folks
just want a taste, they don't have to try a larger cookie. 

(hover over photo to pin) 

OATMEAL LEMON CRUMBLE SQUARES 

CRUST & TOPPING

7 Tb. unsalted butter, softened to room temp
2/3 c. light or dark brown sugar
(original recipe calls for 3/4 c. packed) 
1 tsp. pure vanilla extract
1 c. all purpose flour
1 tsp. baking powder
1/4 tsp. salt
1 c. quick or old-fashioned oats
(I love the texture of old fashioned!) 


LEMON FILLING

1 can (14 ozs.) full fat sweetened condensed milk 
6 Tb. lemon juice
(about 2 lemons) 
1 Tb. lemon zest 

Preheat oven to 350*.  Line an 8-in square baking dish with parchment
paper, leaving overhang on opposite sides.  Spray lightly with non-stick cooking spray. 

CRUST: In a medium bowl, beat butter and brown sugar on medium high speed of mixer until combined, about 1 minute.  Scrape down sides and bottom of bowl; add vanilla; beat until combined. Add flour, baking powder, salt and oats; beat on medium until blended evenly. Mixture will be crumbly. 

Lightly press a little more than half into bottom of prepared baking dish. Bake 12 minutes. 

FILLING: In small bowl, whisk sweetened condensed milk, lemon juice and lemon zest together.  Pour and spread evenly over prebaked crust (while it's hot); Sprinkle remaining crumbled mixture evenly 
over the top. 

Bake for 22 - 25 minutes or until edges are lightly browned.  Avoid over-baking.  Remove from oven and place pan on wire rack to cool. 

When completely cooled, lift bars out with parchment paper overhang.  Cut into squares. 

Store any leftover bars in the fridge for up to 1 week. 
(Or freeze, wrapped tightly, then placed in a ziploc bag, for 2 months) 


Print Friendly and PDF

Thursday, December 8, 2022

Easy Polar Bear Paws (Copycat See's Candy)

'Tis the Season!!!! 

This is a simple treat that can be whipped up when you don't have a lot of time, and they make a great addition to your goodie tray for the neighbors or friends. 


They're made in the microwave so that makes for a speedy process! (But be aware - they do have to cool some before and after dropping into 'paws' onto cookie sheet). 

The original recipe calls for peanuts, but I used cashews and they
were terrific! 

The recipe only takes 5 ingredients...get ready for a tasty,
caramel-y, nutty treat covered in white chocolate (almond bark works great too!) 

(hover over photo to pin) 

POLAR BEAR PAWS 

1 (11 ozs) bag caramel bits 
(use name brand for best quality) 
3 Tbs. heavy whipping cream
1 Tb. unsalted butter
1 c. roasted peanuts or cashews
12 ozs. vanilla almond bark or Ghirardelli white chocolate 
melting wafers 

Line a large cookie sheet with parchment paper; set aside. 

Place caramels, cream and butter into a microwave safe bowl,
microwaving for 30 second increments, stirring, and repeating
until melted and smooth. 

Mix in the nuts; let stand in the bowl to cool about 15 minutes, stirring every 5 minutes or so. 

Spoon onto prepared cookie sheet, making tablespoon sized mounds.  Place in the fridge for about 45 minutes or until set. 

Melt almond bark according to directions, stirring until smooth. 

Dip a chilled caramel cluster in the chocolate, using a fork to remove it.
Allow any excess chocolate to drop off the candy before setting
on parchment paper. Repeat with remaining clusters, keeping them chilled while they wait to be dipped.  

Refrigerate for another 45 minutes or until chocolate is set. 

Don't eat too many before packaging up to give away! 


Recipe inspired by Belly Full


You may also enjoy...

(Peanut Butter Balls with crushed Butterfinger candy) 


Print Friendly and PDF

Saturday, September 24, 2022

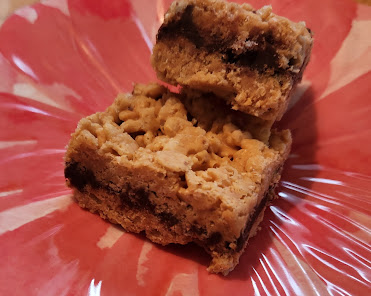
Inside Out Scotcheroos (oh so tasty!)


This is a very special presentation and a 'twist' on a classic recipe!

Thanks much to my dear blogging friend Kitty for sharing
this easy no-bake recipe on her lovely blog, Kitty's Kozy Kitchen.    

She called these CRUNCHY FUDGE SANDWICHES...which is
certainly appropriate, but when I decided it was pretty much 
the same ingredients as the original Scotcheroos recipe from the '70's (this has added powdered sugar), but
was layered differently, I decided to rename them. 

I first made them for a group of gals I had in my home and they certainly loved them.  A week later, I made a batch for my farmer's market baked goods stand and they were gone out the door before my sale ever started! Once folks knew they were available, they requested them NOW, knowing they would sell quickly! 

I do hope you'll try them soon.  They need to chill a bit,
but I can promise it will be worth the wait.  

For an even prettier presentation, place each piece in a paper muffin liner....

I made in the microwave and it worked fine, as long as you heat on a lower power level. 

Enjoy every crunchy flavorful bite!


(hover over photo to pin) 

INSIDE OUT SCOTCHEROOS 

1 c. butterscotch chips
1/2 c. peanut butter
4 c. Rice Krispies cereal
1 c. semi-sweet chocolate chips
1/2 c. powdered sugar
2 Tb. butter
1 Tb. water 

Butter an 8" square pan; set aside. 

Melt the butterscotch chips with the peanut butter in a heavy saucepan over low heat, stirring until blended. (Or melt in the microwave on low power in a microwave safe bowl.)

Stir in the Rice Krispies, stirring until well coated.  Press half of the mixture into prepared pan. (You can wet your hands or spray the back of a big serving spatula and press the top to even it out.) Chill at least 10 minutes. Set remainder aside.

Stir over very hot water: chocolate chips, powdered sugar, butter and water until chocolate melts. (This can also be done in the microwave in a microwave safe bowl, being careful to use a lower power). Spread over chilled mixture. Top with reserved mixture, pressing the mixture down to bring it together. Chill. Cut into squares.

Yield: 25 - 1-1/2" squares 


You may also enjoy this microwave cereal treat...


Print Friendly and PDF

Friday, July 29, 2022

Peachy Baked Oatmeal


I have been a lover of oatmeal for many years.  I especially love it baked...
it's great to have handy to re-heat a few mornings without making a mess. 


I love that it uses canned peaches too, so....

I decided to make this simple recipe when I saw it shared at 
Gooseberry Patch online. 

But I did add 2 c. milk to the recipe. 

As I sat in my chair enjoying it, I recalled another Peach/Oatmeal
dish I have on the blog...it has added Greek yogurt for a protein boost. 

I cut back the sugar amount and diced the peaches, instead of leaving them in slices...it was delicious! COMFORTING! 

I enjoyed it warm, with warmed milk.  MMMM! 

It's quick, easy and mixed in one bowl! 

Do hope you'll give it a try soon. 


PEACHY BAKED OATMEAL 

2 eggs, beaten
2 c. milk 
(almond milk works good too) 
1/3 c. brown sugar
(or use 1/4 c. honey) 
1-1/2 tsp. baking powder 
1/4 tsp. salt
1-1/2 tsp. cinnamon 
1/2 tsp. nutmeg
(I added a little more) 
1-1/2 tsp. vanilla extract
3 c. old fashioned oats, uncooked
1/3 c. oil
1 can (16 ozs.) sliced peaches, partially drained, diced
Serve with warmed milk

Spray 8" X 8" baking dish with non-stick cooking spray; set aside. 
Preheat oven to 375*. 

In a large bowl, combine eggs, milk, brown sugar (or honey), baking powder, salt, spices and vanilla; beat well.  (I mixed it all by hand - no need for a mixer) 
Add remaining ingredients (except warmed milk); mix until thoroughly blended.  Pour into prepared dish. 

Bake 20-25 minutes until the center is set.  Serve in bowls with warmed milk. 

Yield: Serves 6 - 7


Print Friendly and PDF

Sunday, April 10, 2022

Pretty Pink Flamingo Cake

I recently saw this amazing recipe (again) and since I'm in Florida and 
my home and yard are decorated with all kinds of flamingo decor, I thought 
this would be perfect to take to a recent potluck in the RV park where I live for the winter. 

(The cake was actually thicker than it looks!)


(hover over photo to pin) 

It's a Southern Plate original, but I changed just a couple of 
things (which I will tell you as we go)....

What a F-U-N cake!  Big kids as well as little ones will love the
bright color and the combo of cherries and pineapple in the 
frosting...made with Cool Whip. 

Do hope you enjoy soon - it would be awesome for a pool party,
picnic, or summer potluck!  AND...you can make it ahead!!!

It's all very simple, delicious and refreshing, so let's get to it....

(hover over photo to pin) 

PINK FLAMINGO CAKE 

CAKE: 

1 box (15 ozs) white cake mix 
1 sm. box (4-serving size) cherry jello, dry 
3/4 c. vegetable oil 
(or use 1/2 c. applesauce and 1/4 c. oil) 
3/4 c. buttermilk
3 eggs
1 tsp. real vanilla
(I added for a 'pop' of flavor) 

FROSTING: 

8 ozs. crushed pineapple, with juice
(I used half a 20 ozs. can)
1 sm. (4-serv. size) instant (french) vanilla pudding mix
16 ozs. Cool Whip, thawed  
(I used 12 ozs.)
8 ozs. jar maraschino cherries, chopped in half
(you may want to save a few to top the cake) 

Preheat oven to 350*. 

Spray a 9" X 13" baking pan with non-stick spray. 

In a large mixing bowl, add cake mix, jello, (applesauce, if using), oil, buttermilk,
eggs and vanilla.  Beat with an electric mixer for about 2 minutes
until smooth and well blended.  Pour into prepared pan. Bake 30 - 35 minutes 
until cake pops up when touched.  Cool completely. 

In medium bowl, place the pineapple and juice in a bowl; sprinkle dry pudding mix over the top and
stir until blended.  Stir in whipped topping. Add chopped cherries and 
some cherry juice until 'frosting' turns pink, about 1/4 c. juice.  

Spread topping evenly over the cake. Cover and refrigerate up to 3 days before 
serving.  


This is the doormat at my front door at my FL paradise...


Print Friendly and PDF

Sunday, February 20, 2022

Copycat Payday Candy Bars

How excited I was to come across this simple recipe...


Not only do I enjoy Payday Bars on occasion, I love being
able to make my own.

This only takes a few ingredients...and about 10 minutes...waiting for it to set up is the hardest part. 


I gave some 'samples' away for Valentine's Day treats, then took some of these sweet treats to a ladies luncheon, and this recipe was requested. You know that's always a good thing! I cut them in small pieces so they could have a 'taste' without splurging too much. 

(I will tell you if you decide you want to make half a batch...in an 8" X 8" pan...
you won't use a full jar of peanuts) 

(hover over photo to pin) 

COPYCAT PAYDAY CANDY BARS 

1-1/2 jars (16 ozs. each) dry roasted peanuts 
(I used lightly salted) 
5 Tb. butter
1 can (14 ozs) sweetened condensed milk
2 c. mini marshmallows
1 bag (10 ozs) Reese's peanut butter chips 
(use name brand for best results) 
1 tsp. pure vanilla extract
pinch salt

Spray 9" x 13" baking pan with non-stick baking spray. 

Add 1 jar of peanuts in even layer in the bottom of prepared dish; set aside. 

(Read tip below)...In large saucepan, melt butter over medium/low heat. 
Add marshmallows, sweetened condensed milk and peanut butter chips to saucepan; stir well. 

Continue cooking over medium/low heat (for about 5 minutes), stirring
frequently. 

Remove from heat; add salt and vanilla; stir until blended. 

Carefully pour marshmallow mixture over peanut layer in the pan, using a spatula to even out marshmallow mixture as needed. 

Sprinkle remaining peanuts over marshmallow mixture, pressing lightly into the filling. 

Cover and refrigerate at least 4 hours. Cut into bars or squares and enjoy. 

Yield: 24 - 30 pieces, depending on size. 


Recipe found at Kudos Kitchen by Renee
(You can watch a video there if you choose to) 


You also might enjoy...


Print Friendly and PDF

Saturday, October 16, 2021

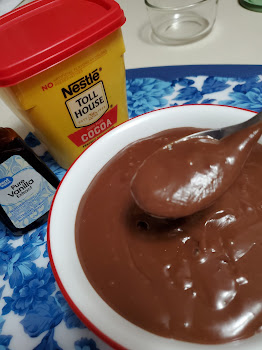
Creamy Homemade Chocolate Pudding (Microwave/Sugarfree Options)

My oh my!

To me, it's hard to beat homemade pudding from scratch!

For me, it's comfort food - something my mama use to make and we loved it warm! 


This is a simple recipe and can be ready to enjoy in minutes. 

And I love it can easily be made sugar free

There are many variations out there, but I wanted to be sure I
keep this one handy, and am so happy I can add it to my blog to make it 
readily available to me...and to you too!

Do enjoy soon!  This is a quick and fabulous dessert to keep you warmed
in the wintertime, but great all year long. 

I know my mama always used Hershey's baking cocoa, but I have
used Nestle and I think that works just as well. 

You might want to double this recipe and make a pie and a few servings of pudding! MMMM Good! 


CREAMY HOMEMADE CHOCOLATE PUDDING 

2/3 c. sugar 
(I used xylitol - may use half sugar and half sweetener or full sugar) 
1/4 c. baking cocoa
3 Tb. cornstarch
1/4 tsp. salt
2-1/4 c. milk
(I used almond milk) 
2 Tb. butter, cut into pieces
1 tsp. vanilla extract 

In a medium saucepan, mix sugar, baking cocoa, cornstarch and salt. Whisk well to blend.  Gradually add milk to saucepan; whisking until smooth. 

Cook over medium high heat, stirring constantly.  Mixture will come to 
a boil; boil 1 minute, stirring constantly. 

Remove from heat; add butter and vanilla.  Whisk to blend. 

Pour into 4 serving dishes. Cover with plastic
wrap. Cool in refrigerator 4-5 hours or until set well.  Top with
whipped cream.  

Yield: 4 servings 

MICROWAVE DIRECTIONS: In a 1-qt. microwave safe bowl, combine sugar, cocoa, cornstarch and salt. Whisk until blended, then slowly stir in milk until smooth. Microwave on high, uncovered, for about 2 minutes. Whisk well, then microwave 3 or 4 more minutes, stirring after each minute, until thick. Add butter and vanilla; allow to cool. Serve as suggested above. 


Print Friendly and PDF

Wednesday, September 15, 2021

Lowfat Pumpkin Spice Muffins - 3 ingredients! (Updated)


ONE OF MY MOST FAVORITE FALL TREATS!

This is one of the first recipes I put on my blog...
they were Weight Watcher friendly when I posted it
over 10 years ago...I have recently updated this page..
They're still lowfat, but don't know the WW points now...

I recently took these to a friend and she needed the recipe
the same day, commenting she couldn't believe they were lowfat! *-*

SO simple, moist and impressive! 

The cinnamon chips really add a nice 'pop', but they're
delicious without too...

These are great for a snack or with soup....De-Lish! You'll never guess these are made with pumpkin! And they're lowfat too!


Pumpkin Spice Muffins


1 - 18 ozs. spice cake mix (chocolate is great also)
1 - 15 ozs. can pumpkin puree
about 1/2 cup water
(I rinse the can and don't measure) 
cinnamon chips, optional 


Preheat oven to 350.  Spray muffin tins with nonstick cooking spray or line with 18 - 20 paper liners.  Add cake mix to large bowl, whisking to get lumps out. Add pumpkin and water to cake mix; beat by hand until smooth.   Stir in 1/2 - 1 cup cinnamon chips, saving a few to dot on top before baking. Divide batter evenly into muffin cups.  Bake 18 - 20 minutes or until done, being careful not to overbake. Cool on wire rack. 

These muffins freeze nicely too. I place in a sealed container or even
on a paper plate inside ziploc freezer bags. 


Linked to Weekend Potluck


Monday, November 30, 2020

Nutella Fudge (4 ingredients/microwave!)


Oh mercy!

This super easy and mighty tasty fudge will most likely make it to your holiday
plates this year!

What's not to love about this amazing and quick recipe!? 


How can you go wrong making it with nutella...that lovely
chocolatey hazelnut spread that's so easy to eat right from the jar!

(If you've never tried it before, you should be able to find it
near the peanut butter at your favorite grocery store.)

Let's get cooking...er, or microwaving!


NUTELLA FUDGE 

1 c. Nutella chocolate hazelnut spread 
1 - 12 ozs. bag semi-sweet (or milk) chocolate chips
1 (14 ozs.) can sweetened condensed milk
(Eagle Brand) 
1 tsp. vanilla 

1/2 c. chopped nuts, optional 
sea salt sprinkles, optional

Line an 8" X 8" square pan with parchment paper; set aside. 

In a large microwavable bowl, heat the nutella and chocolate for 1 minute, stirring after 30 seconds; then after a minute, stirring well until smooth and creamy. 

Stir in the sweetened condensed milk and vanilla until blended.  Mixture will be thick. Stir in nuts until coated with chocolate. 

Spread mixture in prepared pan, smoothing as much as possible. (You can always dip a large spoon in a bit of warm water to spread smooth if need be). 

Sprinkle with coarse sea salt if desired; it helps cut the sweetness. 

Refrigerate at least 2 hours before slicing. 

Cut into small pieces - about 60. 

TIP:  This fudge gets soft when left out at room temp for very long. 


You might also like...


Print Friendly and PDF


Printfriendly