Showing posts with label crowd pleaser. Show all posts

Tuesday, March 26, 2024

Fritos Corn Salad (So easy and delicious!)

Looking for a quick side dish to add to your Thanksgiving meal?  I've got just what you're looking for!

This is a recipe I've been wanting to try since my sweet sis-in-love, Heidi, made it for a family gathering. 

This is one of those recipes I like to call EASY PEASY!

I love corn, but unfortunately (or fortunately - for me!) my hubby doesn't care for Fritos.

I've had a bag of them in the pantry since I enjoyed them with  my quick corny chili, and couldn't resist grabbing two cans of the Mexicorn recently so I could finally make this. 

This is QUICK & EASY & Fantastic!!

The most time consuming part is chopping the onions, so if you do like I did...and chop them ahead of time, this can be made in a matter of minutes. 

A great side dish for any meal!! 

There's no wrong or right amounts to making this...it's all up to our own taste preferences. 

And if you can't find the Mexicorn, just chop some red peppers and mix with canned corn. It's easy enough to tackle from any direction!

I've seen Heidi use an industrial size can of corn, add chopped peppers and onions to it and then mayo to taste. So it can easily be made for a crowd. 


FRITOS CORN SALAD

2 cans (11 ozs each) corn and peppers, drained
(Also called Fiesta Corn...Mexicorn or Southwest Corn)
1 bunch green onions, chopped
1/2 c. grated cheese, optional
1/2 c. mayo
2 TB. vegetable oil
Fritos Corn Chips, crushed
(regular or chili cheese flavored)

In medium bowl, combine corn, onion & cheese. Add mayo and vegetable oil and toss to coat the vegetables well. Cover and refrigerate for atleast 4 hours, but preferably overnight. (I enjoy it right away myself!) 

Before serving, crush Fritos over top. (as much or as little as you'd like...this is my favorite part so I do add a lot. I'm all about crunch). 

I suggest serving this in a longer dish so everyone can have fritos with their portion. 


Linked to Scrumptious Sunday
    Clever Chicks
           Mop it up Monday
      GP Roundup - Picnic
        Foodie Friends Friday 
Meal Plan Monday
Weekend Potluck


Saturday, September 24, 2022

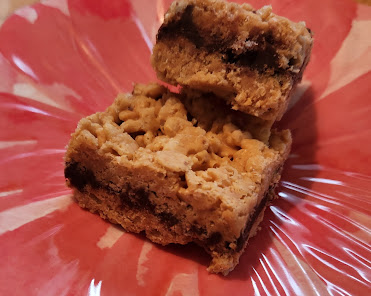
Inside Out Scotcheroos (oh so tasty!)


This is a very special presentation and a 'twist' on a classic recipe!

Thanks much to my dear blogging friend Kitty for sharing
this easy no-bake recipe on her lovely blog, Kitty's Kozy Kitchen.    

She called these CRUNCHY FUDGE SANDWICHES...which is
certainly appropriate, but when I decided it was pretty much 
the same ingredients as the original Scotcheroos recipe from the '70's (this has added powdered sugar), but
was layered differently, I decided to rename them. 

I first made them for a group of gals I had in my home and they certainly loved them.  A week later, I made a batch for my farmer's market baked goods stand and they were gone out the door before my sale ever started! Once folks knew they were available, they requested them NOW, knowing they would sell quickly! 

I do hope you'll try them soon.  They need to chill a bit,
but I can promise it will be worth the wait.  

For an even prettier presentation, place each piece in a paper muffin liner....

I made in the microwave and it worked fine, as long as you heat on a lower power level. 

Enjoy every crunchy flavorful bite!


(hover over photo to pin) 

INSIDE OUT SCOTCHEROOS 

1 c. butterscotch chips
1/2 c. peanut butter
4 c. Rice Krispies cereal
1 c. semi-sweet chocolate chips
1/2 c. powdered sugar
2 Tb. butter
1 Tb. water 

Butter an 8" square pan; set aside. 

Melt the butterscotch chips with the peanut butter in a heavy saucepan over low heat, stirring until blended. (Or melt in the microwave on low power in a microwave safe bowl.)

Stir in the Rice Krispies, stirring until well coated.  Press half of the mixture into prepared pan. (You can wet your hands or spray the back of a big serving spatula and press the top to even it out.) Chill at least 10 minutes. Set remainder aside.
Stir over very hot water: chocolate chips, powdered sugar, butter and water until chocolate melts. (This can also be done in the microwave in a microwave safe bowl, being careful to use a lower power). Spread over chilled mixture. Top with reserved mixture, pressing the mixture down to bring it together. Chill. Cut into squares.

Yield: 25 - 1-1/2" squares 


You may also enjoy this microwave cereal treat...


Print Friendly and PDF

Monday, July 13, 2020

Fudge-Filled Peanut Butter Bars (with a cake mix!)

YUMMMMMM-OOOO! 

I made these luscious bars to add to a recent bake sale...the first 2 customers took all I had! 

They're easy using a cake mix base.  I modified the recipe
(I omitted coconut, nuts and (3/4 c.??) brown sugar) and used a tad more
flour in the chocolate mixture. 

Of course, we all know that anything with sweetened condensed milk 
is always going to be a winner! 

Hope you enjoy this recipe soon.  It has numerous options so you
can make it 'fit' your family's flavor preferences. 
FUDGE-FILLED PEANUT BUTTER BARS 

CRUST &TOPPING: 

1 box yellow cake mix
1 c. peanut butter 
(smooth or chunky)
1/2 c. butter, softened
2 eggs, beaten

FILLING: 

1 c. semi-sweet chocolate chips
1 can (14 ozs) sweetened condensed milk
3 Tb. butter
1 c. flaked coconut, optional
1/3 c. all purpose flour
1/2 c. chopped nuts, optional

Preheat oven to 350*. Spray 9" x 13" baking pan; set aside. 

In a medium bowl, combine cake mix, peanut butter, butter and eggs until dough is smooth.  Mixture will be thick. 
(I mixed by hand). 

Press 2/3 of the dough into bottom of prepared pan, setting aside remainder for the topping. 

Prepare the filling in a medium sauce pan (I used a glass bowl and heated in the microwave on 70% power - after about 45 seconds, stir until melted. 

Stir in coconut (if using), flour and nuts (if using). Mix until combined. Spread filling over dough in the dish. 

Crumble remaining dough evenly over filling.  Bake for 20 - 22 minutes. (Be careful not to overbake) or until it starts to get golden. 
Allow to cool then slice and serve. 


Recipe inspired by The Country Cook


Linked to 


You might also like these recipes using a cake mix...

4-Ingredient Cake Mix Cookie Bars


Print Friendly and PDF

Monday, July 8, 2019

No Bake Chocolate Cookies

I have been wanting to add this classic recipe to my blog for a long time!!! 


This recipe comes from my sis-in-love, Susie, who is the 
"No Bake Cookie Queen" in our family!

And in hers!  A recent weekend her family spent at the lake 
(she has 2 married children and 4 grands),
she made FOUR batches of these cookies for her family, PLUS other things as well! 

I know she's had the recipe memorized for a long time!  She's 'perfected' it to their liking...and to ours! *-*

(Yes, I married into a family of excellent cooks...and BAKERS!) 

She prefers margarine to butter and uses less baking cocoa than most recipes. 

This is a terrific cookie to make in the summer since you don't have to turn the oven on...and everyone dives into them, so they don't last long at all. 


NO BAKE CHOCOLATE COOKIES 

2 c. sugar
(I use less) 
2 Tb. baking cocoa
7 Tb. margarine
1/2 c. milk
3/4 c. peanut butter
1 tsp. vanilla extract
3 c. quick oatmeal 

In a medium saucepan, stir together sugar, baking cocoa, margarine and milk. 
Over medium heat, bring to a full boil; boil for 1-1/2 minutes, stirring 
constantly. Remove from heat; stir in peanut butter until blended.  Add vanilla and oatmeal and stir well.  Drop by tablespoonsful onto waxed paper and let cool.  

(Yes, if you're in a hurry to eat them, you can refrigerate for a little bit) 

Yield: approximately 18 medium sized cookies 


You may also like...

(microwave!)


Print Friendly and PDF

Monday, June 24, 2019

M & M Pudding Cookies! {New Recipe}

I know we're getting warmer temps, so save this awesome recipe for a rainy day if you must!

But DO make it - these are terrific and soft cookies...and aren't they beautiful too?


They get a lot of attention at my farmer's market baked goods stand. 

THERE'S A REASON FOR THAT!

Imagine all the fun you can having using seasonal M & M's...these would be perfect at Christmastime with red and green ones, or July 4th, with red, white & blue ones, Valentine's Day with red, pink and white...etc. etc. 

With all the other sugars in this tasty treat, I lowered the white sugar just a tad, otherwise, this is a perfect recipe as is.

The brown sugar always gives a caramel-y flavor that I adore in cookies! 

Thanks much to my sweet friend Kitty, at Kitty's Kozy Kitchen, whose taste buds are in 'sync' with mine all the time, for sharing this great recipe. 

(hover over photo to pin) 

M & M PUDDING COOKIES 

2-1/2 c. flour
1-1/2 tsp. baking soda
1/2 tsp. salt
1 c. butter, softened
3/4 c. brown sugar
1/2 c. white sugar
(I decreased white sugar from 3/4 c.) 
1 box (4-serv. size) vanilla instant pudding
2 eggs
1 tsp. vanilla
2 c. M & M milk chocolate candies
1/2 - 1 c. white chocolate baking chips, optional 

Preheat oven to 350. In medium bowl, combine flour, baking soda and salt; 
set aside. 

In a large bowl, beat butter, brown & white sugars with mixer on medium for about 1 minute or until fluffy.  Add in dry pudding mix; combine.  Beat in eggs, one at a time, just until mixture is smooth.  Stir in vanilla.  On low, gradually add flour mixture to butter mixture until well blended.  Stir in M & M's and white chocolate chips by hand. 

Drop dough by heaping tablespoonsful about 2" apart onto UNgreased cookie sheets, or parchment-lined cookie sheets. 

Bake 10 - 11 minutes or until light brown.  Cool 2 minutes on cookie sheet; remove to cooling rack.  After cooled completely, store in airtight container at room temp. These cookies freeze nicely. 

Yield: about 3 dozen 

Linked to 


You might also enjoy...


Print Friendly and PDF

Wednesday, June 5, 2019

The Bryan Times - June 3, 2019 - Strawberries & Patriotism

Welcome June! We're all hoping the warmer temps will stay with us this month! June also brings strawberry season and Flag Day. Be sure to celebrate Flag Day on June 14th by flying the Stars and Stripes. 

Tips for displaying Old Glory: 

Don't display a flag at night unless it's illuminated.  If lighting isn't possible, make sure to take yours down at sunset. 

Always be sure the union (the blue field) is at the top left if you hang the flag from a staff projecting from a window or building. 

Never allow the flag to touch anything beneath it. 

Be sure to retire frayed or worn flags - they're no longer fit to serve as a symbol of our country.  Please don't just trash them. Most American Legion or Veterans posts host flag-burning ceremonies for this purpose. 

A dear friend gave me this recipe 20 years ago.  She made it for every reunion or potluck all summer long.  It's a delightful dessert. 

(Hint: If you want to save time, you can use a 16 ozs. pkg. of ready-made sugar cookie dough for the crust and mix an 8-oz. pkg. of cream cheese with a 7-oz. jar of marshmallow cream for the filling.)


STRAWBERRY PIZZA

1-1/2 c. all purpose flour
1 c. cold butter, cut into chunks
1/3 - 1/2 c. brown sugar
1/2 c. chopped pecans
1 - 8 oz. cream cheese, softened (reduced fat is fine)
3/4 c. powdered sugar
1 - 8 oz. tub (lite) Cool Whip, thawed
4 c. cleaned, sliced fresh strawberries
1 - 16 oz. pkg. (sugar free) strawberry glaze


Preheat oven to 350*. In large  bowl, combine flour, butter, brown sugar and nuts. Spread on 14" pizza pan or smaller-sized cookie sheet. Bake 12 - 15 minutes until browned. Cool.

In medium bowl, combine cream cheese and powdered sugar; beat until smooth. Fold in whipped topping and spread over cooled crust. Refrigerate for 15 minutes to set up.

In large bowl, combine fresh strawberries and glaze until coated. Spread out over cream cheese filling, then top with dollops of Cool Whip to serve. Keep leftovers refrigerated. Serves 10 - 15, depending on how you cut it. 

Do you know how to make fresh strawberries last longer?  Try this 'trick'..Just mix 2 cups of cold water with 1/2 cup of white vinegar in a large bowl and soak fresh strawberries (with tops on them) for about 20 minutes! Drain in a colander, rinse them and then lay the strawberries on a towel or paper towels to dry completely, about an hour. (A key to keeping them fresh) Refrigerate until ready to eat. (You won't be able to taste the vinegar!) 

If you are privileged to know Delores Cook from Bryan, you may have tasted these amazing melt-in-your-mouth goodies. (You can just imagine how quickly the COOKS and the BAKERS became friends!) This unusual cookie dough intrigues me. The batter is similar to pancake and they bake only 5 minutes at 450*. They also make wonderful 'shortcake' for your strawberries so enjoy them soon, with or without berries. 

SPECIAL SUGAR COOKIES 

2 c. buttermilk
2 tsp. baking soda
2 c. oil
3 c. sugar 
(I use 2-1/2 c.)
4 eggs
6 c. flour
6 tsp. baking powder
1 tsp. salt
1 Tb. vanilla extract

Preheat oven to 450*. Prepare a cookie sheet with parchment paper or a silpat. 

In small bowl, place buttermilk and baking soda; allow to stand while mixing oil, sugar and eggs in large bowl. Add buttermilk mixture, beating until smooth. Add flour, baking powder, salt and vanilla, beating until well blended. 

Drop by tablespoonsful onto prepared cookie sheet; sprinkle with sugar if desired. (Don't be alarmed - dough will spread) Bake 5 - 6 minutes. Remove to wire rack to cool. Allow cookie sheet to cool a couple of minutes before baking next batch. These freeze nicely.  Yield: about 5 dozen.


"Keep your face to the sun and you will never see the shadows." - Helen Keller (a blind woman) 

Tuesday, December 18, 2018

Peanut Butter Balls (AKA Buckeyes) FAMILY FAVORITE!

ONE WEEK FROM TODAY IS THE BIG DAY...
Will you be ready??? 💋🎄💋

I have to admit...

After I've been making these luscious treats for decades, I just realized
I had never posted about them!

HUH?  

Well, I certainly wanted to remedy that, so here is one of our
family favorites..one that we don't like to go through the holidays without. 

The first time ever I made these was when I was pregnant for our first child (almost 5-0 years ago! = ssssshhh!) After having been given a sample - I HAD to get the recipe from that neighbor who shared.


Have had a blast making these with daughters-in-love and precious granddaughters over the years! 

So now you can make them too.  

I DO live in the state of Ohio, where many folks refer to these treats
as Buckeyes.  They don't completely cover the ball in chocolate, that's really the only difference. 

But for me, these have been named Peanut Butter Balls from the beginning, so I'm sticking with that name.  

You get to choose if you fully dunk...or not.  

The rolling them into balls takes a little while (recipe is easily cut in half)...and then they need to chill so the chocolate adheres a little better.  So plan to whip something else up while you're waiting...or decorate the Christmas tree. 

Or visit with your family while you've got them there...

(This recipe is easily cut in half!) 

Hope you enjoy these awesome treats that add a great flare to any
holiday tray!

(Psst!  This is one of 300 recipes in my first cookbook...
RECIPES & RECOLLECTIONS...on sale for $12 + free shipping!
Click here if you'd like more info..)


PEANUT BUTTER BALLS 

1 lb. butter or margarine, melted
5 c. smooth peanut butter
2-1/2 - 3 lb. powdered sugar
(8 - 9 cups) 
1 TB. vanilla extract
2 (12 ozs. each) pkgs. semi sweet chocolate chips
2 heaping Tb. Crisco 

Line 2 cookie sheets with waxed paper; set aside. 

In large saucepan, stir peanut butter into melted butter; when blended, add vanilla and enough powdered sugar until mixture is slightly crumbly.  While mixture is still warm, roll balls the size of walnuts and place on prepared cookie sheets; chill for 1 hour. 

Meanwhile, melt chocolate chips and Crisco together in a double boiler and keep warm. (You don't want the chocolate to get cold). Dip the chilled balls in chocolate, placing back onto waxed paper and chill to set up. 

Makes a truckload! 

Store in a covered container in a cool place.  They keep well for a few weeks. 
(If you can stay out of them!) 

You may also enjoy...


Print Friendly and PDF

Monday, December 17, 2018

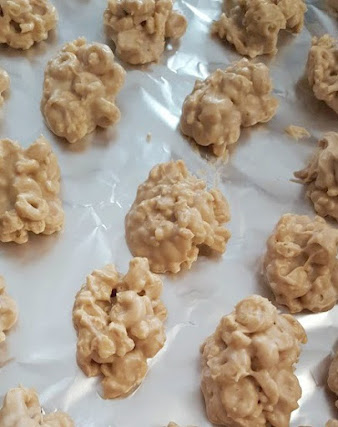
No Bake Avalanche Cookie Treats (Microwave - 5 ingredients!)


If you are needing to make something last minute before Christmas Day arrives,
I've got you covered!

These simple and quick-to-make sweet treats have Biscoff...an irresistible cookie butter...and peanut butter, along with white chocolate and cereal...and they are absolutely and wonderfully delicious!  And ADDICTING!! 

Biscoff is an irresistible, spreadable treat made from those tasty European cookies they still serve on airplanes! (You may be able to purchase Lotus Biscoff Cookies at your local Walmart or grocery store, along with Biscoff spread - near the peanut butter display). 


WOWZERS! 


This recipe is easily doubled if you want a whole bunch!  
(like 4 cookie sheets full!) 

I took them to a Baker sibling gathering and divided every last one of them between four of the siblings!

I don't have the 'answer' as to why they are named as they are, but 
I am just wild about them, no matter what they're called! 

You may want to add this to your holiday rotation every year, after tasting
how very special and irresistible they are. 

PERFECT FOR GIFT GIVING!  
(I had to do something to get them out of the house and out from under my nose!) 

You can substitute marshmallows or peanuts for half of one of the cereals
if you prefer....or sprinkle the tops with mini chocolate chips.
Lots of options here...


NO BAKE AVALANCHE COOKIE TREATS


2 c. Rice Krispies cereal
2 c. (Honey Nut) Cheerios cereal
1 bag (11 ozs. each) white chocolate chips
(or vanilla almond bark)
1/2 c. smooth peanut butter
1/2  c. Biscoff (cookie butter) spread

Line 2 baking sheets with waxed or parchment paper. Set aside.

In a large bowl, stir together cereals. Set aside.

In a large glass bowl, melt the white chocolate chips (or almond bark) in the microwave for 1 minute at 70% power. Stir. Repeat until white chocolate is completely melted and smooth. Be careful not to overheat. Stir in the peanut butter and cookie butter, mixing until well combined.

Pour white chocolate mixture over the cereal mixture. Stir until the chocolate completely coats the cereal mixture. 

Spoon heaping tablespoons of the mixture onto the baking sheet. (I used my medium Pampered Chef cookie scoop - about 2 Tb.., tapping the tops of the cookie to flatten for easier eating.  Allow to cool and harden. (I like setting them in the cool garage - they set up quickly). 

Yield: 2 cookie sheets full 


Recipe inspired by The Country Cook
Linked to Meal Plan Monday


You may also enjoy...

Captain Crunch Peanut Clusters


Print Friendly and PDF

Printfriendly