Showing posts with label no bake. Show all posts

Sunday, August 18, 2024

Biscoff Fluff Dip


If you've ever tasted the delectable treat Biscoff, you KNOW
you're going to love this dish. 

And if you've never tried it, you're missing out BIG TIME! 

Biscoff is a spiced shortbread with bits of caramely flavors similar to the texture of peanut butter - you should be able to find it in the same aisle at the grocery store. 

I got the image and this info from the lotusbiscoff.com page
through Google about how cookie butter was born....

In Belgium, people developed a habit of putting their favorite cookie, Lotus Biscoff, on their bread! Some used the whole cookie, some crumbled it, and others soaked it in their drink first. Delicious, but hardly practical, until someone had a bright idea. Why not make a creamy cookie butter? An innovative Belgian woman created her own recipe and entered it in a competition for a TV show. And guess what? She won! Afterwards, she and Lotus Bakeries worked together to bring Lotus Biscoff cookie butter to its smooth perfection.


Lotus cookies are sometimes given out on airplanes
as a special treat. 

You can use 'light' ingredients in this recipe, but I suggest you
use full fat.  The dip will last longer and hold up better with
full fat ingredients. 

Now that we've established the basics, let's get on with this simple and amazing dish.... 

Get ready for the crowd to go wild....and be sure to have copies of this recipe on hand. 

And be careful not to eat the jarfull with a spoon!  It's hard to resist! 

(hover over photo to pin) 

BISCOFF FLUFF DIP 

1 (8 ozs) block cream cheese, softened to room temp
1 (7 ozs) tub of marshmallow creme
1 heaping cup Biscoff cookie butter
3 Tb. whole milk or 1/2 & 1/2
1 tsp. pure vanilla extract
1 (8 ozs) tub frozen whipped topping, thawed
10 Biscoff (Lotus) cookies, coarsely crushed,
plus a couple more crushed for garnish 
1/2 c. mini chocolate chips, divided
Dippers: Biscoff cookies, pretzel crisps, graham crackers,
strawberries or apple slices 

In a large bowl, beat cream cheese until creamy and smooth. Add in 
marshmallow cream and cookie butter; beat until smooth.  Add
milk and vanilla, beating until blended.  

Fold in whipped topping with a rubber spatula, adding crushed
cookie butter crumbs and about half the chocolate chips until
thoroughly combined and fluffy. 

Cover and chill for 2 hours to let flavors blend.  Set on the counter
a few minutes to soften before stirring.  Stir and transfer to serving bowl. Garnish with extra crushed cookies and remaining
chocolate chips.  Serve with your choice of dippers. 


You may also enjoy...

(with Biscoff) 



Print Friendly and PDF

Saturday, September 24, 2022

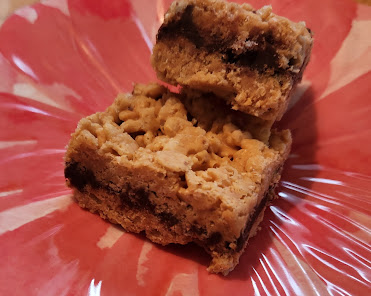
Inside Out Scotcheroos (oh so tasty!)


This is a very special presentation and a 'twist' on a classic recipe!

Thanks much to my dear blogging friend Kitty for sharing
this easy no-bake recipe on her lovely blog, Kitty's Kozy Kitchen.    

She called these CRUNCHY FUDGE SANDWICHES...which is
certainly appropriate, but when I decided it was pretty much 
the same ingredients as the original Scotcheroos recipe from the '70's (this has added powdered sugar), but
was layered differently, I decided to rename them. 

I first made them for a group of gals I had in my home and they certainly loved them.  A week later, I made a batch for my farmer's market baked goods stand and they were gone out the door before my sale ever started! Once folks knew they were available, they requested them NOW, knowing they would sell quickly! 

I do hope you'll try them soon.  They need to chill a bit,
but I can promise it will be worth the wait.  

For an even prettier presentation, place each piece in a paper muffin liner....

I made in the microwave and it worked fine, as long as you heat on a lower power level. 

Enjoy every crunchy flavorful bite!


(hover over photo to pin) 

INSIDE OUT SCOTCHEROOS 

1 c. butterscotch chips
1/2 c. peanut butter
4 c. Rice Krispies cereal
1 c. semi-sweet chocolate chips
1/2 c. powdered sugar
2 Tb. butter
1 Tb. water 

Butter an 8" square pan; set aside. 

Melt the butterscotch chips with the peanut butter in a heavy saucepan over low heat, stirring until blended. (Or melt in the microwave on low power in a microwave safe bowl.)

Stir in the Rice Krispies, stirring until well coated.  Press half of the mixture into prepared pan. (You can wet your hands or spray the back of a big serving spatula and press the top to even it out.) Chill at least 10 minutes. Set remainder aside.

Stir over very hot water: chocolate chips, powdered sugar, butter and water until chocolate melts. (This can also be done in the microwave in a microwave safe bowl, being careful to use a lower power). Spread over chilled mixture. Top with reserved mixture, pressing the mixture down to bring it together. Chill. Cut into squares.

Yield: 25 - 1-1/2" squares 


You may also enjoy this microwave cereal treat...


Print Friendly and PDF

Wednesday, December 15, 2021

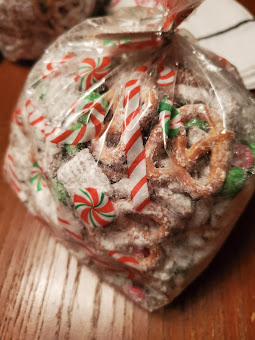
Christmas Muddy Buddies

A simple cereal mixture, coated with melted chocolate and peanut butter,
with a powdered sugar coating.  Add candies, nuts and pretzels to give for a fun gift!

Or make visitors feel special when they drop by! 


                                               I love all the colors - so inviting and fun! 

Melted chocolate/peanut butter/butter blended onto the cereal..
before sprinkling with powdered sugar! MMMM! 


Bagged up ready to give as gifts! 

(hover over photo to pin) 

CHRISTMAS MUDDY BUDDIES 

  • 3 c. Corn Chex
  • 3 c. Rice Chex
  • (Or 6 c. Crispix cereal) 
  • 1 c. semi-sweet chocolate chips
  • (I like milk chocolate too) 
  • 1/2 c. creamy peanut butter
  • 4 Tb. salted butter
  • 1 tsp. vanilla
  • 1/2 tsp. salt
  • 2 c. powdered sugar
  • 1 - 12 ounce bag of Christmas M&Ms
  • 2 - 3 c. pretzels
  • 1 c. salted peanuts, optional 
  • 1 - 2 c. Reese's mini peanut butter cups


  • In a large bowl add Chex cereals and stir gently using your hands; set aside.

  • In a medium glass bowl add chocolate chips, peanut butter, and butter; melt in the microwave in 30 second intervals, stirring after each one until the mixture is melted and smooth.

  • Add vanilla extract and salt, stirring until fully combined.

  • Pour the chocolate/peanut butter/butter mixture on top of the Chex cereal; gently mix with a spatula until fully covered.

  • Working in two batches, pour half the Chex mix into a ziploc bag with 1 cup of powdered sugar, seal the bag and shake until all the cereal is covered with powdered sugar.

  • Pour the powdered sugar covered Chex onto a baking sheet; set aside. Repeat with the other half of the Chex cereal and powdered sugar in the same bag, making sure to seal the bag. Shake until the Chex is completely covered with powdered sugar.
  • (The kids will enjoy helping with this process!)

  • Pour the cereal mixture onto another baking sheet and allow to cool completely.   I cover with parchment paper for easy cleanup. 

  • When ready to share or serve, place cereal mixture in a large bowl; add M&M’s, pretzels, peanuts, and Reese's peanut butter cups and mix until fully combined and enjoy! 

Box or bag up to give to happy recipients! 

It's beautiful - so many pretty colors! Very festive for gift giving! 


A VERY MERRY CHRISTMAS TO YOU & YOURS! 


Print Friendly and PDF

Friday, December 20, 2019

Butterfinger Balls


Yumohyum!

These delightful balls of goodness are like a peanut butter ball (or Buckeye) with crushed Butterfinger candies in them!

How could anyone say no to them? 


A little time consuming to roll into balls, but an easy recipe to make to add to your holiday. 

I loved dipping them in white almond bark (tinted green) and shaping them into a Christmas tree on a platter for a fun presentation.

I got the original recipe from Plain Chicken, but the batch made A LOT!
She said it would make 3 - 4 dozen and I just wanted fewer, and made them
smaller (still about the size of a walnut) because they are rich, so do your thing...this recipe is easily doubled for a bunch more! 

May you and yours enjoy a SWEET CHRISTmas season!


BUTTERFINGER BALLS 

1-3/4 c. powdered sugar
1-1/2 c. graham cracker crumbs
3 Butterfinger bars (1.9 ozs. each), crushed
1/2 c. + 2 Tb. butter, melted
3/4 c. crunchy peanut butter (or creamy)
12 ozs. chocolate almond bark or chocolate candy coating (discs)

Colored sprinkles, optional

In a large bowl, combine powdered sugar, graham cracker crumbs and Butterfinger pieces; set aside.

In medium glass bowl; combine melted butter and peanut butter until smooth.
Add to crumb mixture and stir until blended. Shape into walnut-sized balls, place
on wax paper lined cookie sheet; refrigerate for 30 minutes.

Melt chocolate according to package directions; dip chilled balls into chocolate,
placing them back onto the waxed paper.  Sprinkle with holiday sprinkles if desired.

Refrigerate any leftovers.
Yield: about 3 dozen treats

Linked to
Meal Plan Monday


You may also enjoy...

Nutter Butter Fudge (microwave!)


Print Friendly and PDF

Thursday, December 12, 2019

Homemade Copycat Kit Kat Bars

I haven't made these luscious treats for a few years, so it was past time! 

I bought a box of Club crackers a couple of weeks ago, so when the time came, I'd be ready...set...GO! 


These are pretty simple and so delicious! Smashed graham crackers, butter, brown sugar, and milk make up the filling. 

The topping is melted peanut butter and chocolate chips!

I keep mine in the garage so when I need a treat to share, they are ready for me.  (And it helps to keep them 'hidden') 

A beautiful and tasty addition to your holiday tray.  It's the only time of the year I can trust myself to make them - because it's December...and
anything goes, right??? 

Enjoy every crunchy bite!  


HOMEMADE KIT KAT BARS

8 ozs. Club Crackers (or Waverly)
1 c. butter (2 sticks)
2 c. graham cracker crumbs
3/4 c. light brown sugar, packed
1/2 c. milk
1/3 c. white sugar

1 c. semi-sweet chocolate chips 
2/3 c. creamy peanut butter

Line a 9" X 13" ungreased baking dish with a single layer of crackers. In large saucepan, over medium heat, melt the butter.  Add graham cracker crumbs, brown sugar, milk and sugar. Bring to a gentle boil; boil for 5 minutes. Stir constantly so it doesn't burn. 

Remove from heat; spread half the butter mixture evenly over the crackers. Place another layer of crackers over the graham cracker mixture; spread remaining butter mixture over top; add final layer of crackers. 

In a small saucepan, add chocolate chips and peanut butter.  Melt over med-low heat, stirring constantly until blended. Spread evenly over the top layer of crackers.  

Allow to cool about 10 minutes; cover with plastic wrap and place in a cool place (my garage works nicely for this...but you can put them in the fridge for an hour if you'd like)...until chocolate layer is set. 

When it is completely cool; cut into small squares. 

Enjoy!  If you have any leftovers...keep covered in a cool place. 


Linked to these parties...

Meal Plan Monday


You may also enjoy...

No Bake Avalance Cookie Treats (Microwave - 5 Ingredients)
(Uses Cookie Butter) 


No Bake Reese's Peanut Butter Squares


Print Friendly and PDF

Tuesday, September 24, 2019

Simple Amish Stove-Top Custard


This is a very easy dish and the custard tastes wonderful!

You simply mix milk, eggs, sugar, vanilla and salt together...pour into custard cups (or coffee mugs),  set in water in a pan on the stovetop...bring to boil and turn off heat..let stand a while. 


I was excited to get a copy of Wanda Brunstetter's 
THE BEST OF AMISH FRIENDS COOKBOOK COLLECTION

You can see it here online..

This is a photo of the cover...


Wanda shares historical facts about Amish settlements across the country and their history..very interesting reading. 

And lots and lots of unusual recipes.  This is the first I've tried in the book, but have a list of others to try as well. 

I did use part xylitol (sugar substitute) and allowed the custard to set 10 minutes longer...it was still a softer set, but tastes mighty fine! 


AMISH STOVE-TOP CUSTARD

2 c. milk
2 eggs, beaten
1/2 c. sugar (or less)
1 tsp. vanilla
dash salt
few dashes of nutmeg 

(Directions shared just as they are in the book)

Mix all ingredients just until blended.  Pour into four custard cups (or coffee cups) and set cups in a kettle with an inch or two of cold water. (Pan should have a tight-fitting lid). Bring to boil, turn off heat, and let set for 45 minutes.  Unbelievable, but this makes perfect custard.

(Shared by Clara Yoder of Windsor, MO) 

Linked to 


You might also enjoy...


Print Friendly and PDF

Tuesday, September 10, 2019

Pumpkin Spice Rice Krispy Treats

I just realized I'd never posted this tasty snack though I've made them the last couple of years.

A simple and fun fall treat the kids can help make...made easy by adding a box of instant pumpkin spice pudding mix to the melted marshmallow mixture.
(Say that fast 3 times!!=)


Everyone needs a quick and easy 'go to' and this one is extra special fall treat. 

The pudding mix can sometimes be a bit hard to find, but you can also substitute 2 tsp. pumpkin pie spice and it's yummy too. 

Be sure to stock up if you do find the pudding because it won't be on shelves for long! 

I love that it's quick and easy so can be made when you're in a rush to
find something to take to that fall festival or gathering!

The melted white chocolate over the top is optional, as are the
cutsie sprinkles, but doncha just love that special touch?  

TIP:  Try to press the cereal into the pan LIGHTLY!  If you press too hard,
the mixture tends to harden and makes it tough. 


PUMPKIN SPICE RICE KRISPY TREATS 

6 c. Rice Krispies
1/4 c. butter
1 (10 ozs.) bag mini marshmallows
(Or if you can find them, using pumpkin flavored marshmallows! squeal!)
1 sm. (4-serv. size) box pumpkin spice instant pudding  
(Butterscotch is super good too) 

Lightly spray 9" x 13" dish with cooking spray. 
In a large saucepan, melt the butter.  Add the marshmallows and
dry pudding mix.  Over low heat, stir constantly (I used a whisk) until mixture is blended and smooth.  Stir in the rice krispies; stir until coated. Dump mixture into prepared pan; press evenly, (but not too hard). Let cool; cut and serve.

MMMM good! 

You might also enjoy...


Print Friendly and PDF

Friday, September 6, 2019

Contest-Winning Raspberry Cream Pie (No Bake)


WOW!  It sure is hard to believe summer is ending but alas...tis true, so...
 I wanted to give you one last NO BAKE dessert before jacket weather hits! 


This is a Taste of Home recipe so you know it's gonna be delicious. 
I normally reduce the sugar amount and made this sugar free using xylitol, and Sukrin powdered sugar. (sugar free)

It looks like this - I buy it at Amazon.  Yes, it's pricey, but some things are just worth splurging on, especially when it tastes as good as this does! 

I love that it doesn't have an after taste and works nicely in my desserts...
baked or unbaked. 

You can use fresh or frozen raspberries, so this is a tasty dessert to serve
all four seasons! 

Another change I made was that it called for orange liqueur...I used 1/2 tsp. of orange extract instead.  I noticed a little bit of 'zip' to the pie because of it too...soo good! 

Hope you enjoy this delightful pie as much as we did. 


CONTEST WINNING RASPBERRY CREAM PIE 

CRUST: 

1-1/2 c. crushed vanilla wafers (about 45 wafers)
(graham crackers work also) 
1/3 c. chopped pecans
2 Tb. sugar or sugar substitute
1/4 c. butter, melted

FILLING:

1 pkg. (8 ozs.) cream cheese, softened
2/3 c. powdered sugar 
(or sugar free substitute)
2 Tb. orange liqueur
(or 1/2 tsp. orange extract), or more to taste
1 tsp. vanilla extract
1 c. heavy whipping cream, whipped ** (See TIP below)

TOPPING:  
3/4 c. sugar (or substitute)
3 (heaping) Tb. cornstarch
3 Tb. water
2-1/2 c. fresh or frozen raspberries, divided

In medium bowl, combine wafer crumbs, pecans, sugar and butter. Press onto bottom and sides of a greased 9" pie plate. 

In large bowl, beat cream cheese, powdered sugar, liqueur and vanilla until light and fluffy.  Fold in whipped cream; spread into crust.  Chill until ready to serve. 

In small saucepan, combine sugar and cornstarch; stir in water and 1-1/2 c. raspberries.  Bring to a boil; stir for 2 minutes or until thickened. Transfer to a bowl; refrigerate until chilled. 

Spread topping over the filling or dollop topping on each slice
when serving.  Garnish with remaining berries. 

It's a beautiful work of art! 


**TIP - For best results, chill glass bowl and mixer beaters for 5 - 10 minutes before whipping so you'll get more volume. 


You might also enjoy...

Easy Biscoff Cheesecake Pie


Print Friendly and PDF

Printfriendly