Showing posts with label Holidays. Show all posts

Thursday, February 8, 2024

Valentine Cookie Cups (with a hidden treat inside)

These little cookie treats are perfect for Valentine's Day!

You start with a sugar cookie mix and add a few ingredients, 
then wrap dough around a candy kiss to surprise each recipient. 


I really LOVE shortcuts so this makes it easy for a last minute treat
if you need one. 

Get the kids to help by unwrapping the chocolates...and maybe even wrapping the dough around each candy. 

Homemade gifts from the heart are the best! These sweet treats definitely say LOVE, especially with the hidden 'kiss' inside. 

Don't waste any time...get busy making these fun cookie cups to 
give to friends or share with your family. They'll be so glad you did!

ENJOY A SWEET VALENTINE'S DAY!!!  


VALENTINE COOKIE CUPS 
(with a hidden treat inside) 

1 bag (17.5) ozs. package sugar cookie mix
1/2 cup (1 stick) salted butter, melted
3 Tb. all purpose flour
1 large egg
several drops pink or red food coloring
(I didn't measure, I just squeezed out a stream) 
24 Hershey's kisses (or hugs), unwrapped
Valentine sprinkles, optional 

Spray a mini cupcake pan with cooking spray - you'll need 24 total. Set aside. Preheat oven to 350*. 

In a large bowl, blend sugar cookie mix, melted butter, flour, egg and food coloring (I added food coloring to melted butter before adding to mix - you may add a few more drops as you're mixing if desired.)  I stirred this by hand. 

Using about  1 Tablespoonful of cookie dough, roll into a ball; flatten in your hand...covering most of your palm, placing the 'kiss' in the center. Wrap the dough around it to create a ball; roll until smooth. 

Place the cookie balls into muffin cavities and repeat until you use all the dough. 

Bake for about 12 minutes or until the outsides of the dough look set. Remove from oven and then top with sprinkles. 

Let cookie cups cool in pan for at least 15 minutes before removing from pan to cooling rack. 

Recipe inspired by Princess Pinky Girl


You may also enjoy....



Print Friendly and PDF

Wednesday, December 27, 2023

Fresh Cranberry Fluff Salad

I love all things cranberry!

I have been seeing this recipe again and again on the internet as I searched
for something to make to share with friends on Christmas Day. 


It's a simple recipe and it brought on a lot of OOHH's and AAHH's! 

I even lightened it by using Truvia and a little bit of sugar-free white
chocolate pudding mix and no one had any idea it was low sugar

The recipe is basically fresh ground cranberries, drained crushed pineapple, mini marshmallows and whipped topping. 

But this is one of those recipes that you can make your own...there are
numerous options.  Nuts...no nuts...lots of marshmallows...or only a few...instant pudding or none at all...sugar or sweetener....whipped heavy cream or Cool Whip.  

You can also add chopped apples. 

It is a fabulous recipe and I hope you'll try it while you're able to get
fresh cranberries at the grocery store.  You could use thawed cranberries, but I think fresh ends up with the best results. 

If you don't make it soon, be sure you add this one to your pinterest file. 

(hover over photo to pin) 

FRESH CRANBERRY FLUFF 

1 (12 ozs.) bag fresh cranberries, cleaned & sorted 
1/2 - 1 cup sugar or 15 packets of Truvia sweetener
(add more later if you think it's too tart) 
8 ozs. crushed pineapple, drained
(you can add 2 Tb. instant white chocolate pudding mix....in that case I leave a little more pineapple juice)  
2 c. mini marshmallows, divided 
1 tub (8 ozs.) frozen whipped topping, thawed
(or 1 c. heavy cream, whipped to stiff peaks) 

Chop cranberries in a food processor, pour into a bowl.  Stir in sweeteener or sugar; cover, and refrigerate overnight.

Add well-drained pineapple (& instant pudding if using) and marshmallows. Mix to combine.

Fold whipping topping in and stir by hand until smooth. 

Serve topped with a few mini marshmallows. 

A lovely 'salad' that can also be a dessert!  

Recipe inspired by That Skinny Chick Can Bake


You may also enjoy 


Print Friendly and PDF

Saturday, February 11, 2023

Copycat Crunch Candy Bars (3 ingredients!)

This is so easy and can be a last minute goodie for....


Or for whenever! Anytime is good!

I saw this recipe after I had found some Ghiradelli milk chocolate
chips for $1 a bag!  REALLY! 


And I had rice krispies on hand so how could I resist??? 

Enjoy these with your family - what a great way to say
you love them!!! 


COPYCAT CRUNCH CANDY BARS 

2 - 12 ozs. bags chocolate chips
(milk, semi-sweet, dark chocolate) 
4 c. Rice Krispies cereal 
1 Tb. coconut oil
1/4 tsp. kosher salt

Line an 8" x 8" baking dish with parchment paper, leaving
enough to overhang 2 sides. 

Place the chocolate chips in a microwave-safe bowl along with
the coconut oil.  Heat for 1 minute; stir well; heat in 15 second increments until melted thoroughly. 
(Sometimes you just have to stir more and microwave less) 

Fold the cereal into the chocolate until thoroughly blended; pour into prepared pan.  Spread mixture evenly, pressing into pan...you might want to drop it on the counter a few times to help settle it in the pan...sprinkle with salt.

Refrigerate at least 30 minutes until chocolate has set; cut into bars with a very sharp knife.  

(If you refrigerate it more than an hour or two, let it warm a bit on the
counter before slicing to avoid crumbling) 

You might also enjoy...


Print Friendly and PDF

Thursday, December 1, 2022

Chocolate Chip Cookie Mix in a Jar (with free printable!)

I have always loved giving mixes as gifts! The recipients can enjoy them 
at their own leisure.  


I think it's especially nice during the holidays when there's so many other sweets, or you're so busy doing other things.  How great is it to dump and mix some cookies for drop in company, or to take to your neighbors at the last minute? 

When trying to use up the 'last' of ingredients I had on hand before heading South for the winter, I quickly made up a couple of jars 
of these to give as gifts, telling the recipients I wanted them to have cookies even after I wasn't around to make them for them!  

I was tickled to find The Happier Homemaker simply by googling.
What GORGEOUS printables with instructions to give along 
with the mix! (Go to the link to print them there). 

Grab your jars and the kids can help you measure and fill. 
(This is a fun project for a group of family members to make
several ahead for gift giving later). 

You may add nuts to top off the jar, but know the mix will not keep as 
long (only up to 3 months) if nuts are added. 

(When I made these years ago, I loved the effect of 
sticking a (clean) pencil down the side for a 'sand' look.  
These didn't turn out as pretty as what I've done in the past
because I saw my letter opener, it was easy enough to clean,
but a pencil makes for a prettier look.)  

That part isn't necessary at all...just experiment and see what you like best. 


COOKIE MIX 
1-3/4 c. all-purpose flour
3/4 tsp. baking soda
3/4 tsp. salt
3/4 c. packed brown sugar
1/2 c. granulated white sugar
1-1/2 c. (9 ounces) semi-sweet chocolate chips
1 clean quart mason jar 

Combine flour, baking soda, and salt in small bowl. Place mixture in 1-quart jar, using the back of a big spoon to pack the flour mixture down around the outside of the jar. Add the brown sugar next using the same method to pack it down.  Pour white sugar over the brown sugar, then add the chocolate
chips. 

Cut a square or round piece of material (You can also use an upside down paper cupcake liner), covering the flat lid, then adding
the screw on lid, then adding ribbon or twine to attach the recipe instructions. 


Enjoy!  And Happy Gift Giving! 


                                                                                                       5-Ingredient No Bake Avalance Cookie Treats
(great for making a lot at once!!!) 


Print Friendly and PDF

Wednesday, September 7, 2022

Simple Chocolate Peanut Butter Fudge (5 ingredients!)


Everyone needs an easy fudge recipe right?  

I love trying new recipes and this one was top notch!
Creamy and rich....right up my taste bud alley! 

The customers at my farmer's market stand were glad for this one! 


Chocolate and peanut butter are surely a classic combo, so you can't go wrong with this one. 

Hope you give it a try soon...and make sure you're not alone, because
no one will know you made the fudge if you don't share it! *-* 

It's too tempting to hide it and eat it all yourself....😍😍

And of course, you can use peanut butter chips if you don't want
the chocolate! 


(to pin hover over photo) 

SIMPLE CHOCOLATE PEANUT BUTTER FUDGE 

  • 1 and 1/2 (heaping) cup granulated sugar
  •   (original recipe calls for 2 c.) 
  • 1/2 c. milk (2% or whole) 
  • 3/4 c. semi-sweet chocolate chips
  • 3/4 c. peanut butter (chunky or creamy)
  • 1 Tb. real vanilla 
Butter a 9" x 9" square pan; set aside. 

Measure chocolate and peanut butter; set aside with vanilla. 

Place sugar and milk in heavy sauce pan.  Over medium heat, stir with a wooden spoon until well combined. 

In a few minutes this mixture will come to a boil. Boil (all over) for 2 minutes over medium heat, stirring constantly with wooden spoon. 

Remove from heat; using a whisk, beat in the chocolate chips until smooth.  Stir in peanut butter and vanilla until well blended. 

Pour fudge into prepared pan and let it cool at room temperature.  It usually takes 30 - 40 minutes to set up enough to cut.  (I let mine chill after coming to room temp, for a couple of hours before cutting). 

Store in airtight container. 


Recipe inspired by Mirlandra's Kitchen


You may also enjoy...


Print Friendly and PDF

Wednesday, December 15, 2021

Christmas Muddy Buddies

A simple cereal mixture, coated with melted chocolate and peanut butter,
with a powdered sugar coating.  Add candies, nuts and pretzels to give for a fun gift!

Or make visitors feel special when they drop by! 


                                               I love all the colors - so inviting and fun! 

Melted chocolate/peanut butter/butter blended onto the cereal..
before sprinkling with powdered sugar! MMMM! 


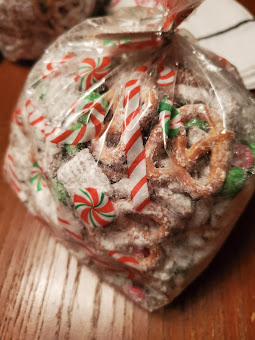
Bagged up ready to give as gifts! 

(hover over photo to pin) 

CHRISTMAS MUDDY BUDDIES 

  • 3 c. Corn Chex
  • 3 c. Rice Chex
  • (Or 6 c. Crispix cereal) 
  • 1 c. semi-sweet chocolate chips
  • (I like milk chocolate too) 
  • 1/2 c. creamy peanut butter
  • 4 Tb. salted butter
  • 1 tsp. vanilla
  • 1/2 tsp. salt
  • 2 c. powdered sugar
  • 1 - 12 ounce bag of Christmas M&Ms
  • 2 - 3 c. pretzels
  • 1 c. salted peanuts, optional 
  • 1 - 2 c. Reese's mini peanut butter cups


  • In a large bowl add Chex cereals and stir gently using your hands; set aside.

  • In a medium glass bowl add chocolate chips, peanut butter, and butter; melt in the microwave in 30 second intervals, stirring after each one until the mixture is melted and smooth.

  • Add vanilla extract and salt, stirring until fully combined.

  • Pour the chocolate/peanut butter/butter mixture on top of the Chex cereal; gently mix with a spatula until fully covered.

  • Working in two batches, pour half the Chex mix into a ziploc bag with 1 cup of powdered sugar, seal the bag and shake until all the cereal is covered with powdered sugar.

  • Pour the powdered sugar covered Chex onto a baking sheet; set aside. Repeat with the other half of the Chex cereal and powdered sugar in the same bag, making sure to seal the bag. Shake until the Chex is completely covered with powdered sugar.
  • (The kids will enjoy helping with this process!)

  • Pour the cereal mixture onto another baking sheet and allow to cool completely.   I cover with parchment paper for easy cleanup. 

  • When ready to share or serve, place cereal mixture in a large bowl; add M&M’s, pretzels, peanuts, and Reese's peanut butter cups and mix until fully combined and enjoy! 

Box or bag up to give to happy recipients! 

It's beautiful - so many pretty colors! Very festive for gift giving! 


A VERY MERRY CHRISTMAS TO YOU & YOURS! 


Print Friendly and PDF

Monday, November 30, 2020

Nutella Fudge (4 ingredients/microwave!)


Oh mercy!

This super easy and mighty tasty fudge will most likely make it to your holiday
plates this year!

What's not to love about this amazing and quick recipe!? 


How can you go wrong making it with nutella...that lovely
chocolatey hazelnut spread that's so easy to eat right from the jar!

(If you've never tried it before, you should be able to find it
near the peanut butter at your favorite grocery store.)

Let's get cooking...er, or microwaving!


NUTELLA FUDGE 

1 c. Nutella chocolate hazelnut spread 
1 - 12 ozs. bag semi-sweet (or milk) chocolate chips
1 (14 ozs.) can sweetened condensed milk
(Eagle Brand) 
1 tsp. vanilla 

1/2 c. chopped nuts, optional 
sea salt sprinkles, optional

Line an 8" X 8" square pan with parchment paper; set aside. 

In a large microwavable bowl, heat the nutella and chocolate for 1 minute, stirring after 30 seconds; then after a minute, stirring well until smooth and creamy. 

Stir in the sweetened condensed milk and vanilla until blended.  Mixture will be thick. Stir in nuts until coated with chocolate. 

Spread mixture in prepared pan, smoothing as much as possible. (You can always dip a large spoon in a bit of warm water to spread smooth if need be). 

Sprinkle with coarse sea salt if desired; it helps cut the sweetness. 

Refrigerate at least 2 hours before slicing. 

Cut into small pieces - about 60. 

TIP:  This fudge gets soft when left out at room temp for very long. 


You might also like...


Print Friendly and PDF


Monday, November 16, 2020

Praline Crunch (Great for gift giving!)


OH.MY.YES.PLEASE!

This crunchy, caramel-y, sweet & salty treat is fabulous!  
And ADDICTIVE too! 

Would be a welcome change from all the usual baked goods that happen during the holidays. 


Perfect for snacking while watching tv...
And perfect to bag up and give as gifts!

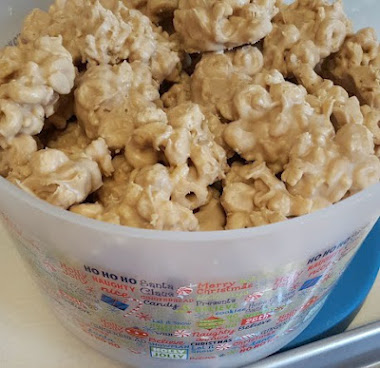
BE AWARE: This 'sauce' is NOT a heavy coating...all of the cereal doesn't get coated...it's lightly sweetened so you get some 'bare' cereal along with coated...I think that makes it perfect! Not too sweet!

The ingredients are things you most likely have on hand. 

I know pecans are pricey - they can be omitted if you prefer - but they

sure add a lovely crunch!

Don't miss keeping this recipe handy so you are ready to 'go' when
the holiday season hits!

Did I mention it's addictive!! 😂


PRALINE CRUNCH
(Large batch) 

1 box (18 ozs) Crispix cereal
(or Rice Chex)
2 c. pecan halves
1 c. butter
2 c. brown sugar
1/2 c. corn syrup
1 tsp. vanilla
1/2 tsp. salt

Yield: about 18 cups


(Small batch) 

1 box (12 ozs.) Crispix or Rice Chex cereal
1-1/2 c. pecan halves
2/3 c. butter
1-1/4 c. brown sugar
3 Tb. corn syrup
1/2 tsp. vanilla
1/4 tsp.

Yield: about 12 cups


Preheat oven to 225*. In a large bowl, combine cereal and pecans; set aside. 

In medium saucepan, combine butter, brown sugar and corn syrup.  Cook on medium high until it comes to a boil. Boil for 5 minutes, stirring occasionally; remove from heat. 

Stir in vanilla and salt.  Pour over cereal mixture and stir carefully until evenly coated. 

Spread mixture between 2 cookie sheets with sides and bake for 45 minutes, stirring each pan every 15 minutes.  

Spread on waxed paper to cool; store in airtight containers. 


You may also like...


Print Friendly and PDF

Printfriendly